
Joystick / Thumbstick WASD Keys
The goal of this example is to demonstrate how to use a joystick to trigger multiple keyboard keys when it is pushed. This assumes that the reader is familiar with the basics of creating Building Blocks as shown in the Detailed Tutorial.
This example will generate the "W", "A", "S", and "D" keyboard keys based on the current position of the joystick on the X-keys XK-12+Joystick. When the joystick is pushed in a diagonal direction, two keys will be generated simultaneously.
For this example, three types of building blocks are needed: Axis building blocks that respond to the two axes that the joystick controls, Range building blocks to detect when the joystick is pushed in a direction that corresponds to a keyboard key, and Single Key building blocks to generate the keyboard keys.
The values that the joystick axes generate for each direction can be determined by creating Axis building blocks for the joystick's X-Axis and Y-Axis, then observing the blocks' output values as the joystick is moved in each direction. The joystick axes XK-12+Joystick generate the following values:
| Joystick Position | X-Axis Value | Y-Axis Value |
|---|---|---|
| Center | 0 | 0 |
| Left | –127 | |
| Right | 127 | |
| Up | –127 | |
| Down | 127 |
Since the values of the axes change continuously as the joystick is pushed, a decision must be made about how far the joystick needs to be pushed to trigger a keyboard key. For this example, the halfway point between an axis' center value and its full-scale value will be used. Using values that are closer or further from an axis' center value will increase or decrease the sensitivity of the joystick.
| Keyboard Key | X-Axis Value | Y-Axis Value |
|---|---|---|
| W | –64 or lower | |
| A | –64 or lower | |
| S | 64 or higher | |
| D | 64 or higher |
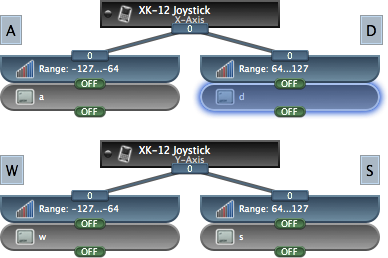
The first step is to create an Axis building block for the joystick's X-Axis and Y-Axis. Two Range building blocks are then attached to each of the Axis building blocks.
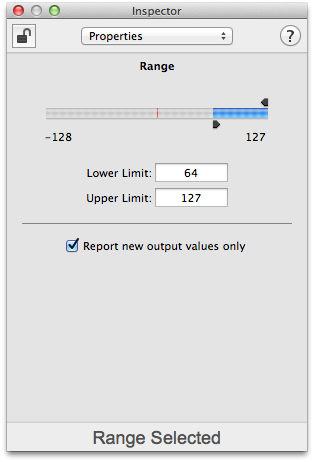
Each Range block is configured to turn its output ON when its joystick axis has been pushed far enough to generate keyboard output.
For example, the highlighted Range block to the right will turn its output ON when the X-Axis is pushed more than halfway to the right.

The next step is to create four Single Key building blocks and connect one to each of the Value Selector building blocks.
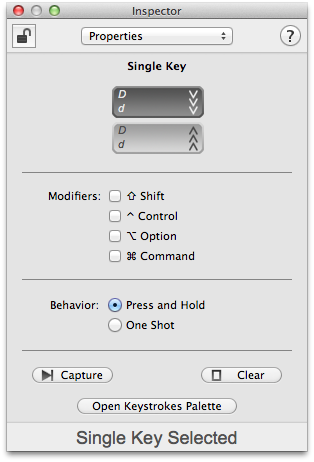
Each Single Key block is configured to generate the keyboard key that corresponds to the direction that its Range block detects.
With building blocks configured in this manner, ControllerMate will generate keyboard keys in response to the joystick on the X-keys XK-12+Joystick. An easy way to verify the proper operation of these building blocks is to open the Keyboard Viewer that is included with OS X. The Keyboard Viewer window will show which keys are currently pressed on a physical keyboard, or on ControllerMate's virtual keyboard. ControllerMate's Output window can be used when text is generated, or when only one key at a time is pressed.